The Image Properties determines how the images would be processed. This forms the core function of Batch It!.

|
Image Format
|
The supported image formats are JPEG, TIFF, PNG, BMP, PCX and GIF.
|
|
|
|
|
Resizing Method
|
Batch It! allows you to resize your images 4 ways, by pixels (upsize and downsize), by percentage (upsize and downsize), by ratios (upsize and downsize supported) and in frames.
|
|
|
|
|
|
The In Frame method is a much requested feature which was introduced in Batch It! v4.0. This method allows the system to create a frame based on the Width and Height dimensions and by setting the frame background color would resize all images so that it will fit within the frame. All images are resized while maintaining Ratio Aspects and in the center of the frame. We are made aware that some programs online and offline which requires all images to be of fixed dimensions or they would get truncated or can squashed. Using the In Frame method would allow all images to be rendered perfectly each time and every time.
|
Upsized images may degrade in image quality due to the lack of details and depending on how much larger the upsizing is.
|
Width
|
Use with Upsize or Downsize by Pixels and Keep Dimension Ratio Aspect, it defines the minimum or maximum width that would cause a trigger point. This is also used by the In Frame resizing method to determine the actual Width of the Frame Container.
|
|
|
|
|
Height
|
Use with Upsize or Downsize by Pixels and Keep Dimension Ratio Aspect, it defines the minimum or maximum height that would cause a trigger point. This is used by the In Frame resizing method to determine the actual height of the frame container.
|
|
|
|
|
Keep Dimension Ratio Aspect
|
When selected, the image would be ensure the images would retain its dimension ratio. You may set either width or height as 0 then the image width or height would be used as the maximum or minimum trigger point.
|
|
|
|
|
|
If you uncheck this option, images would be upsize or downsize to the dimension specified with the Width and Height.
|
|
|
|
|
Swap Dimensions if Portrait Image
|
This feature is useful if you are working with both landscape and portrait images at the same time and you do not want the portrait images to be smaller than the landscape images.
|
|
|
|
|
|
Digital cameras are made to take landscape images but by turning the camera clockwise or counter-clockwise, you can take portrait images. For example, if you want all landscape images to be saved as maximum 800 x 600 and portrait to be saved as 600 x 800 then select this option. If not, all heights would be set at 600 pixels and all widths as 800 pixels (minimum)
|
|
|
|
|
Frame Color
|
This is used by Resizing in Frame method to determine the background color of the frame.
|
Resampling Method
Batch It! offer 6 resampling methods. Each offering a different algorithm in getting you that picture perfect resized images.
The fastest resampling method is None which merely remove alternate pixels or duplicate the nearest pixels in resizing the images. To a certain degree, you will see jagged edges or what we call pixelization.
We will spare you the complex mathematical computation in the various resampling method and just mentioned that each method would employ certain degree of color matching and averaging to select the best match. A degree of blur effect would be added to reduce the effects of pixelization.
Lanczos3 is the most comprehensive and accurate resampling method but it is the slowest.
|
JPEG/PNG Quality
|
This sets the JPEG or PNG image quality in percentage. Because of the lossy compression algorithm employed by JPEG, each time an image is worked on, the image quality would degrade and as such, Batch It! would load and transform each image to Bitmap which uses a lossless compression algorithm to reduce the image degrading. And as such, all image saved would be considered new.
|
|
|
|
|
|
A 100% JPEG Quality does not equate to exactly the same quality of the original as the image quality can be perceived as improved or degraded depending on the resampling method employed. As such, at 100% the image file size could increase.
|
|
|
|
|
|
We recommend a JPEG Quality of between 75 to 95 as the best settings as it would represent the best mix of image file size and image quality.
|
|
|
|
|
JPEG Smoothing (%)
|
JPEG Smoothing is a technique used to apply blur effect to the image edges to reduce pixelization. If possible, set JPEG Smoothing to 0%.
|
|
|
|
|
|
We noticed that images with slanted straight lines such as roofs are not rendered correctly on digital cameras and during a resizing (especially at downsizing), the effects becomes more evident. Applying JPEG Smoothing of 5 to 10% would usually correct this.
|
|
|
|
|
Progressive JPEG
|
Use Progressive JPEG option if you are using the images on the web. This will allow the image to progressive show while it loads so the viewer do not want to wait for the entire image to be downloaded before it is shown.
|
|
|
|
|
|
This is however is not supported on pre-1995 image programs and may cause incompatibility issues.
|
|
|
|
|
Keep IPTC Header
|
IPTC Headers are used publishing houses to embed image description and articles into images like news headlines. If you are concerned about file size, you can uncheck this option, this will reduce the image file size by about 16 to 37kb.
|
|
|
|
|
Dots Per Inch
|
The Dots Per Inch option is usually not relevant unless you are using the images on desktop publishers or word processors to determine the image dimensions on the page. The higher the DPI, the smaller the image would appear on these media.
|
|
|
|
|
|
Monitors usually have fixed DPI and would use the image pixel size to determine image sizes on screen. Modern printers would have interpolation algorithm to upsize or downsize images to fit to the page and would usually ignore the image DPI settings.
|
Image Effects
The Image Effects determine the additional functions you want to apply on the images.
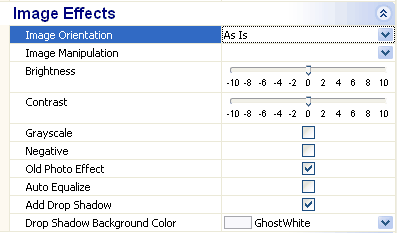
Image Orientation
This setting sets the Image Orientation for the initial image orientation for the images being loaded to the filename manager in the Control Center. The actual image orientation used would be the ones set in the Control Center.
There are 6 options provided.
|
As Is
|
- Keep the image orientation as it is.
|
|
Rotate Clockwise 90°
|
- Rotate 90° to the Right
|
|
Rotate Anti-clockwise 90°
|
- Rotate 90° to the Left
|
|
Rotate 180°
|
- Rotate 180° from the Right/Clockwise
|
|
Flip Left
|
- Reverse Left with Right
|
|
Flip Down
|
- Rotate 180° from the Left/Anti-clockwise
|
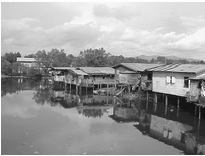
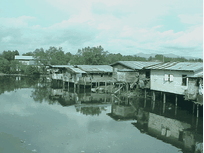
Note : With the Rotate 180°, left becomes right and right becomes left while the Flip Down would keep the left as left.
To illustrate the difference.
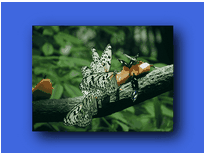
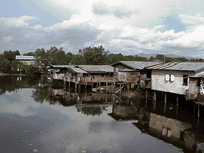
Original Image
Rotate 180 °
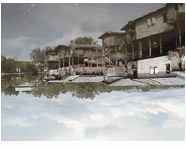
Flip Down
Image Manipulation The program offers 6 Image Manipulation methods which includes Sharpen, Sharpen More, Blur, Blur More, Emboss and As Is.
Setting Image Manipulation to As Is with apply no Image Manipulation.
Brightness
This adjusts the brightness intensity of the image. 0 represents no change in brightness. A negative brightness setting would darken the image and a positive brightness setting would brighten it.
Contrast
This adjusts the contrast intensity of the image. 0 represents no change in contrast. A negative contrast will decrease the image contrast and a positive setting would increase it.
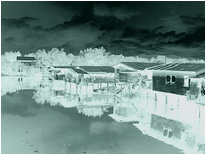
Grayscale
This will convert the image to its grayscale representation. However, the image actual color depth will still remain as original.
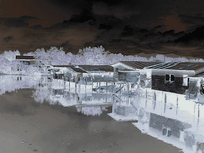
Negative
This will convert the image to look like the film negative.
Old Picture
This reduce the image intensity and give it the 'old' look and feel as with prints which color would fade in time.
Auto Equalize
The auto equalize feature will compute the median of the colors based on its intensity on the picture as a whole and auto adjust them to the median. Images which are too overly exposed or under exposed would benefit from this. But do use with caution if there are drastic color spike, it will upset the adjustment.
For those who are adventurous, you could apply all the four adjustments (Grayscale,Negative,Old Picture and Auto Equalize) it will give you a near InfraRed effect as taken through an InfraRed Filter.
Add Drop Shadow
Batch It! allows you to add shadow frames to make your images stand on.
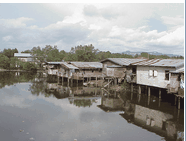
The above images does not use the drop shadow effect.

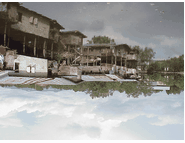
With Drop Shadow Effect
|
Drop Shadow Background Color
|
As you may want to place the images on various background such as on the web and your background color is different from the default white, you could use this option to select one which matches your background so that it would blend in.
|